Basically , you may refer here for details. It looks complicated , I actually succeed by referring this.Therefore, I will quote from them , combine and simplify from both of their methods.
Livespaces > xml > wordpress > blogger
Live Space Mover , through Python , will fetch live space's comments and posts ,save as wordpress .xml format , which is support for all ..
Live Space Mover 是通过Python脚本抓取live space的日志和留言,保存为wordpress支持的通用xml文件。最后将文件通过wordpress后台管理提供的导入功能,将日志迁移过去。 ( quoted from here )
將MSN Spaces備份成Wordpress可導入的 .xml
Stage 1
1.Go to Python 2.5.4 , you may download any of them , and I downloaded this.
下載 Python Runtime 2.5.4
2.Next download Beautiful Soup 3.0.6. and live-space-mover . Extract them.
Beautiful Soup 3.0.6 和最新版本的 live-space-mover
3. Install STep 1.
先安裝Python 2.5.4 不改設定一路按到底
4. Place the file BeautifulSoup.py in the same directory of live-space-mover.py, or install it into Python
runtime by yourself. ( I put both of them in the directory of python folder ( mine is E:\Python25 )
把Beautiful Soup 3.0.6裡的BeautifulSoup.py 複製到C:\Python25. 把live-space-mover-XXX.zip裡的live-space-mover.py 也一樣複製到C:\Python25
5. You need to have the two files on the right in the folder.
你会看到这些
Stage 2
Sign in /登入 MSN Live Spaces , change your live space settings:
1. Options > General
Make sure it is open to anyone (not only to your contacts)
選項 > 一般資訊
Set time zone to the same with your wordpress blog
Set date format to yyyy/mm/dd, or mm/dd/yyyy. This probably depends on the locale setting of your system or browser, the point is to make the “YEAR” appear in your date. If the program fails and complains about date parsing, try to use the option -t to specify date time format. For example, the time on my space is shown like “9:45 PM”, but if your time is shown like “9:45:15 PM”, you may want to use a command line like below
將日期格式設定為 年/月/日 ex:2009/4/26
時間格式設定為 上下午 時:分 ex:上午 07:43
2 Options > permission
set to "Everyone "
選項 > 使用權限
共用權限設定 所有人 (公開)
3.options > blog
Set “Blog entry date display” to “Show the blog entry date in the header”
選項 > 部落格
部落格內容的日期顯示 在頁首顯示部落格內容日期
Stage 3
Go to
Start > RUN >
★ 進DOS (在XP下 開始 > 執行)
Key in / 輸入cmd
Key in / 輸入cd .. (可回到上層目錄 一直回到C碟)
Key in / 輸入cd\Python25
Key in / 輸入python live-space-mover.py -s http://your ID/帳號.spaces.live.com/
( Eg. http://waiyee926.spaces.live.com/ )
Wait for DOS windows , until you see this .
等待DOS畫面 , 直到看到LINE XXX INFO Finished! Congratulations!
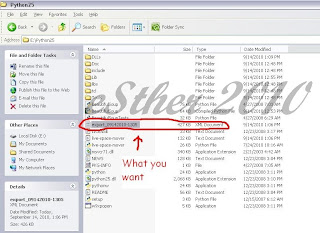
Back to C:\Python25 ( mine is E:\Python25 ) , you will see a file named export_xxxxx.xml . ( check image below )
回到C:\Python25 , 資料夾內有個 export_xxxxx.xml 的文件 就是你的Live Spaces備份檔啦
Stage 4
Sign up a wordpress blog account here . 申請一個Wordpress的blog帳號
Dashboard > Tools > Import . Put in the .xml file previously into the blog .
將剛剛的.xml檔匯入Wordpress blog
Stage 5
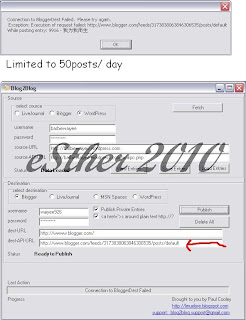
Use Blog2Blog . Origin : Wordpress. Key in your id & password (1 & 2 ) . Click "FETCH "(3 ).Please be patient.
使用Blog2Blog . 在來源處選Wordpress並輸入帳號密碼 ( 1 & 2 ) . 按Fetch 等一下 ( 3 )
資料載入完成後
在目的處選Blogger並輸入帳號密碼
按Publish ( 4 & 5 )
Picture 4 : click 1 by 1 box. It can only publish 50 everytime. Js redo it .
At picture 5 ( since I did not uncheck the rest , by checked all , this window came out . It means you can only import 50 posts in 24 hours. Just click ok , and it will resume the next time you import again .
186 entries.
If you choose 50 , then it will has no problem.
This will not come out if you checked 1 box ( 50posts only)
You may try to enter
at Destination > dest -API-URL :
http://www.blogger.com/feeds/*blog ID*/posts/default
eg. http://www.blogger.com/feeds/3173838063846306535/posts/default - mine )
check from your blog's URL
( ATTENTION: Noted added Oct, 9, 2008
Users with trouble (0 entries downloaded/exceptions/etc) downloading blogspot.com blogs:
We've identified a bug in the latest google feeds and client libraries. (http://groups.google.com/group/bloggerDev/browse_thread/thread/6fa01659eb21b0d for deep details)
Basically as a work-around, you need to put the blogger.com feed SOURCE-API-URL. To find this you will need to view the html source of your blog and look for the string that will contain "service.post" it will contain a URL like:
"http://www.blogger.com/feeds/*blog_id_number_here*/posts/default"
That is the URL you'll need for the SOURCE-API-URL or DEST-API-URL , quoted from here .)
part of the posts ( limited to import 50 posts only ) . my 1st import.
What I've done is that , I redo the steps, since each time it will import 50 posts, I clicked 1 box only each time. In the end I clicked 4 times ( redo 4x ) . and they worked . All posts were imported to my blogger now =)
In fact, I don't know exactly how it works by importing through blog2blog because I got error ( I mentioned above ) too during the progress .
So I have tried an alternative but import the .xml exported from wordpress .
In fact, blog 2 blog will do this for us. Yet , when there is error , just find alternative ... since you got the .xml
Thanks to Broom ,his guide is great but a bit complicated for me... I hope mine here is less complicated


